Ads

Showing posts with label Google SEO 2019. Show all posts

Monday, July 27, 2020

How to Prevent Search Engines from Indexing WordPress Sites?

Prevent Search Engine

Site owners will do anything to get their websites indexed. However, you might not want search engines to crawl through your website if it’s still in development. In a case like this, it’s recommended to discourage search engines from indexing your site. Stick with us if you want to learn more about this topic!

  1. Discouraging Search Engines From Indexing WordPress SitesUsing the WordPress Built-In FeatureEditing robots.txt File Manually
  2. Password Protecting Your WordPress WebsiteUsing Hosting Control PanelUsing WordPress Plugins
  3. Removing Indexed Page From Google

Why Would You Want To Stop Search Engines From Indexing Your Site?

There are some cases where people want to discourage search engines from indexing their sites:

  • Unfinished websites — at this stage of errors and trials, it’s best not to have your website available to the public eyes.
  • Restricted websites — if you plan to have an invite-only website, you do not want it to get listed on SERPs.
  • Test accounts — web owners create a site duplicate for testing and trial purposes. Since these sites are not designed for the public, don’t let it get indexed by search engines.

So how do you block search engines from indexing your site? Well, take a look at several options below and try it yourself.

1. Discouraging Search Engines From Indexing WordPress Sites

The simplest way to stop search engines from indexing your website is by preventing them from crawling it. To do it, you need to edit your website directory’s robots.txt file. Here are a few ways to achieve that:

Using the WordPress Built-In Feature

Editing WordPress robots.txt is quite easy as you only need to use a WordPress built-in feature. Here’s how:

  1. Login to WordPress admin area and go to Settings -> Reading.
  2. Scroll down and locate the Search Engine Visibility option.
  3. Check the option that says Discourage search engines from indexing this site.
  4. Save Changes, and that’s it! WordPress will automatically edit its robots.txt file for you.

Editing robots.txt File Manually

If you prefer the manual option, you can use File Manager or an FTP client to edit the robots.txt file.

In this article, we’ll show you how to do it through the hPanel’s File Manager:

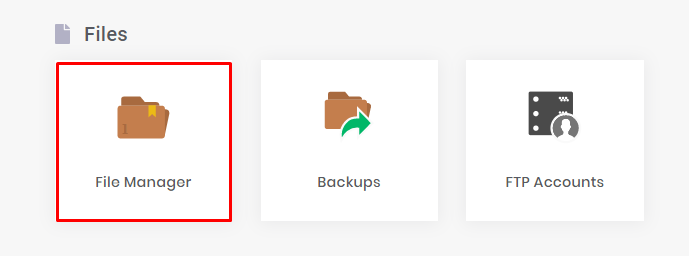
  1. Login to hPanel and locate File Manager under the Files area.

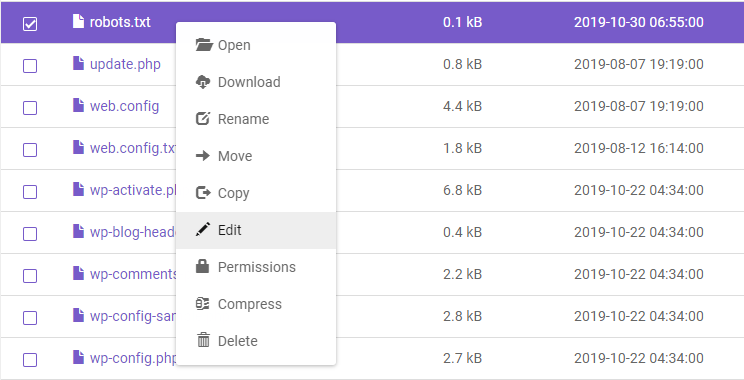
  2. Go to your WordPress root directory folder (in most cases, it’s public_html) and find the robots.txt file. If you can’t find it, create a new blank file.
  3. Right-click on the file and select Edit.

  4. Enter the following syntax:

    User-agent:
    * Disallow: /

The code above will prevent search engines from indexing your whole site. If you want to apply the disallow rule to a specific page, write the page’s subdirectory and slug. For example: Disallow /blog/food-review-2019.

The syntaxes in robots.txt files are case sensitive, so be careful when editing.

2. Password Protecting Your WordPress Website

Search engines and web crawlers don’t have access to password-protected files. Here are a few methods to password protect your WordPress site:

Using Hosting Control Panel

If you are a Hostinger client, you can password protect your website using hPanel’s Password Protect Directories tool:

  1. Access hPanel and navigate to Password Protect Directories.
  2. Enter your root directory into the first field.
  3. Once the directory is selected, enter your username and password and click Protect.

If your root directory is public_html, leave the directory column blank

The process in cPanel is also quite similar:

  1. Log in to your cPanel account and head to Directory Privacy.

  2. Select your root directory. In our case, it’s public_html.
  3. Check the Password protect this directory option, and name the protected directory. Press Save.
  4. Create a new user to login to the protected website, and that’s it!

Using WordPress Plugins

There are tons of plugins that can help to password protect your site. However, the Password Protected plugin might just be the best one out there. It’s been tested with the new WordPress update, and it’s pretty straightforward to use.

After installing and activating the plugin, head to Settings -> Password Protected and configure the settings to match your needs.

3. Removing Indexed Page From Google

Don’t worry if Google has indexed your site. You can remove it from SERPs by following these steps:

  1. Set up Google Search Console for your website.
  2. Access Google Search Console of your newly added website and scroll down to Legacy tools and reports -> Removals.
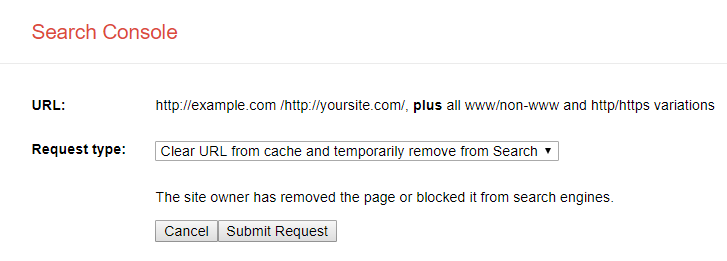
  3. Click the Temporarily hide button and enter the URL you want to remove from Google.
  4. On a new window, choose Clear URL from cache and temporarily remove from search, then Submit Request.

And that’s it! Google will temporarily remove your site from search results. Make sure to apply the previous methods to prevent Google from indexing your site again.

Conclusion

There you have it! Quick and easy ways to discourage search engines from indexing your sites. Here’s a quick recap of the methods we’ve learned today:

  • Edit the robots.txt file, which can be performed automatically or manually.
  • Password protect your website by using a plugin or your hosting control panel.
  • Remove indexed pages from Google via Google Search console.

If you have any other methods, or if you have any questions, please do let us know in the comments. Good luck!

Monday, February 10, 2020

16 On-Page SEO Factors You Must Update On Your Blog At All Times

On-page SEO Checklist

Why is on-page SEO so important?

Of course your classic on-page SEO tweaks still work. Even better than before actually. And I’m not the only one who says that. Take it from Google too.

Behind those fancy AI-based algorithm updates lie your usual keyword optimization hacks. With no keyword input and relevant related words, Google’s bots simply wouldn’t be able to understand your content and place it where relevant.

Other studies like this one from Backlinko also justify the use of on-page SEO methods. Just run any search for a competitive keyword and you’ll notice most websites try to keep their on-page factors clean and relevant.

When done the right way, optimizing your pages for optimal ranking can also:

  • Boost, even double, your website traffic
  • Bring in more leads
  • Improve your click-through-rates
  • Increase time on page
  • Reduce bounce rates
  • Match reader intent
  • Position you as a thought leader in your industry
  • And so much more!
  • On-page SEO factors to optimize right away

But you have so many factors to optimize, where do you start?

On-Page SEO

Below are all the on-page SEO factors that are worth your time:

1. SEO-friendly URL

Short URL that includes the keyword.

As an example:

www.domain.com/blog/on-page-seo

is better than a default URL

www.domain.com/blog/sfeogytytuyjyj.html

or a long one

www.domain.com/blog/on-page-seo-factor-to-optimize-this-year.html

or the other likes.

Make sure you think this through before you publish the article. Changing the URL after will make you lose your links unless you add a redirect.

Another issue to pay attention to is to make sure you won’t be using the same keyword in another URL for a more profitable page.

For instance, if you’re an SEO agency you might want a page like:

www.domain.com/on-page-seo

But if you later decide to also put together a guide for the same keyword, you won’t be able to use the same URL so you’ll have to publish it on your blog as www.domain.com/blog/on-page-seo or change the URL.

2. Title Tag

Your main keyword should ideally be placed at the beginning of your title. Especially in the case of the SEO title. You can set this one separately from the Yoast WordPress plug-in.

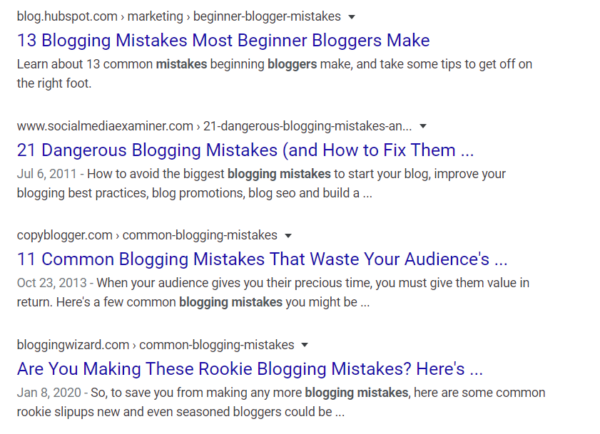
Here are 4 examples for the “blogging mistakes” keyword where the 1st result is optimal:

Title Tags

The SEO title is not final like the URL so you can change it at any time after publishing the post.

If you’ve got a bit more time, do some A/B testing on your SEO title. Change it every 3-4 months to see which one works best for your CTR.

3. Headings! Headings!

Nailing the keyword optimization of your headings is so important, yet so many writers seem to skip this part.

You’ve got multiple options here:

Take your main keyword and create natural headings around it. This means your keyword will appear in 2-3 headings.
Place your main keyword in the 2-3 headings mentioned at point 1 and optimize the rest of your headings for secondary keywords.
Above all, remember to include at least H2s and H3s in your text. [like this article, btw] Ideally, you’d have separate designs for these so they are easily distinguishable by readers.

4. The first 100 words

Another ignored on-page SEO factor is including your keyword in the first 100 words of your article. I don’t always do this because sometimes it doesn’t seem natural to shove a keyword in the first few words since you might want to set the scene first.

But if you can manage to add it in the first sentence, way to go! Google will automatically consider this topic is of top importance to the article and thus crawl it accordingly.

5. Frequent keywords, but no stuffing!

Stuffing is actually quite hard to do these days without readers reporting your content.

RECOMMENDED FOR YOU
Webcast, March 5th: How AI Can Find Opportunities and Shorten Your Sales Cycles
REGISTER NOW
Keyword stuffing looks something like:

These are our blog blogging blogger tips for bloggers who blog on blogs for bloggers…

Not cool. I know.

Instead, natural keyword frequency looks more like:

We’ve put together this list of tips for first-time bloggers who are looking to improve the quality of their blog posts…

And then just use your keywords sparingly and in a natural way throughout the entire article.

6. Outbound links

These are the links you add to relevant content on other websites. The general rule (or best practice if you want to) is to only link to materials that will be of value to your readers or support your claims.

You can try my trick and create a strategy to always follow for this. For instance, I only link to reports or studies and occasionally to external tools readers might want to test.

Don’t add too many though. Google didn’t disclose a number of outbound links that’s ok to use, but most blog guidelines [and my own experience] will accept a maximum of 3 links.

Also, try not to link to content that targets the same keyword you want to aim for. Google will automatically think that even you consider that content is better so it will be much more difficult to rank higher than that competitor.

7. Internal links

We’ve got two situations here.

The first case is when you add links to your other blog posts or web pages in this article you’re currently putting together. By all possible means, make sure the links are relevant to your topic.

The second instance happens after you publish your article. Try to find 2-3-4 of your other posts that are relevant to your new post and place a link to this new article on relevant keywords only.

Disclaimer: Avoid link stuffing. This means you shouldn’t use your top-performing article to link to every possible post of yours.

For all external and internal links, make sure you check them regularly so the links are not broken or the content there hasn’t fundamentally changed and no longer matches your needs.

8. Page speed

Smaller images, enable file compression, reduce redirects, minify CSS, JavaScript, and HTML, improve your server’s response time, and anything else PageSpeedInsights tells you to change.

9. Responsive design

Google has been seriously penalizing websites that are not responsive.

Mobile traffic is still growing so even if you don’t believe Google will have a say, your readers will when they won’t be able to click your call-to-action button.

10. Meta description

This is the small snippet of content that users will see under your SEO title in the search results.

Two secrets here:

Include your keyword for Google.
Include a CTA or an enticing fact or incentive to make people want to click on your post. This will also boost your click-through-rate.
Yes, the meta description too can be changed even years after first publishing the article.

Go way back in your blog’s history and check all meta descriptions. You’ll be surprised to discover missing ones too.

11. Review the readers’ intent

So you have this post that ranked well for 2 years but then it died. Do a SERP research again to see if the readers’ intent has changed or maybe your competitors managed to answer better to their needs.

This is also a perfect time for you to review the entire structure of the article and run a new keyword research to check for new potential secondary keywords to target. Keyword volumes and difficulty can change often. Every week even. So keeping an eye on the evolution of the keywords that are highly valuable for your business is vital to ensure you maintain your position.

12. Remove duplicate content in all its forms

Canonical links will be your best friend here. Especially for e-commerce websites who commonly have duplicate content on their category pages.

But even if you’re not an e-commerce website, I recommend making sure you have the canonical link set for every page of yours. Yes, that includes articles.

A much-too-common issue beginner marketers make is adding their blog posts to multiple categories or tags on their blog. This inevitably creates duplicate content so bear through the temptation and stick to one category.

13. ALT tags and file names

You’re probably already aware that the keyword your want to rank for should also be part of your ALT text in at least one image. [Still, try to add ALT tags to all images and include secondary keywords in them.]

Disclaimer: Don’t do keyword stuffing here either. A good ALT tag is “blogging mistakes for beginners”. A bad ALT tag looks like this “blogging mistakes bloggers blogs beginner mistakes”

What many writers are still not aware of is the importance of having keywords in the file name of your images as well. You know, blogging-mistakes.png instead of screenshot56.png.

14. Data markup

This only applies to specific websites where you want to post news, reviews, recipes, and the likes.

Your results will appear like:

SEO Data

Instead of:

bad markup

So many options here that can be added and tested at all times. Heach to Schema.org for all the details to see if there’s anything right for your blog type.

15. Got social media?

If you don’t yet have social media sharing buttons on your posts, go right now and get a plug-in. Many tools let you customize the text readers will share (or at least the suggestion) so they can bring in more views via their own networks.

16. No more black hat techniques!
Finally, make sure your website is free of any black hat SEO techniques. These include spammy links, cloaking, doorway pages, hidden text and links, spam comments, duplicate content, link farms, paid links even.

Surprisingly or not, Google is starting to pick up on paid links. That’s why many large websites strictly prohibit selling links on their website. Unfortunately, you’ll still occasionally receive emails from writers who are willing to provide such links. Just say no. It’s cheaper, more valuable, and easier to become an author on that website yourself anyway.

Where to take your on-page SEO efforts next?

Bookmark this article or create your own checklist of everything you need to change. If possible, make sure you analyze all of these on-page SEO factors and how they perform on your own pages.

I won’t lie to you and tell you the process is easy or quick. It can take months if you have a year’s worth of content or more.

But it’s worth it!

Got any extra tips on optimizing the on-page SEO factors for your website? What has worked for you and where are you still experimenting? Let us know!

Read more at: business2community.com

Wednesday, September 11, 2019

Evolving “nofollow” – New Ways to Identify The Nature of Links

Google Nofollow Update
Nearly 15 years ago, the nofollow attribute was introduced as a means to help fight comment spam. It also quickly became one of Google’s recommended methods for flagging advertising-related or sponsored links. The web has evolved since nofollow was introduced in 2005 and it’s time for nofollow to evolve as well.

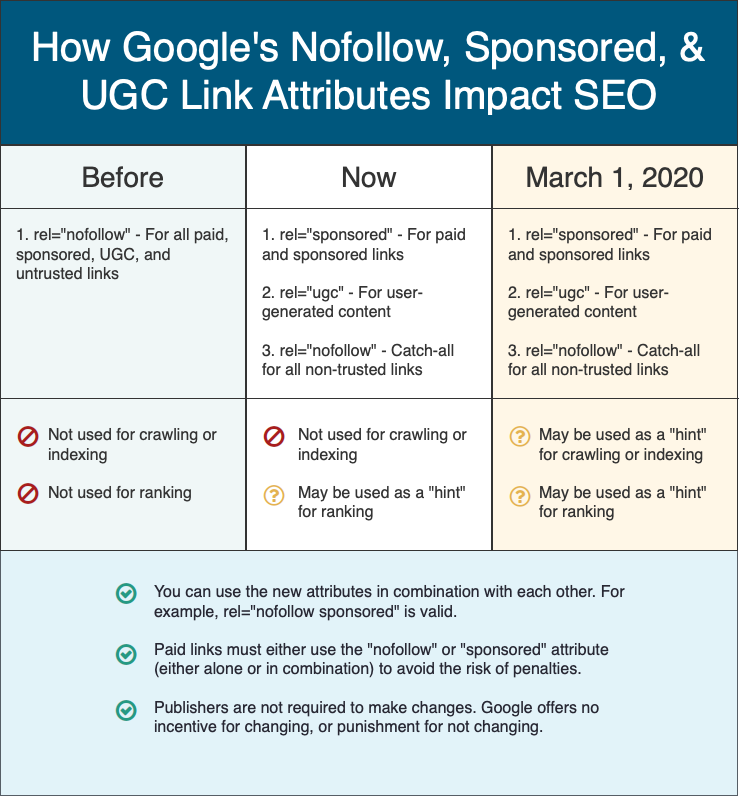
Today, we’re announcing two new link attributes that provide webmasters with additional ways to identify to Google Search the nature of particular links. These, along with nofollow, are summarized below:

rel="sponsored": Use the sponsored attribute to identify links on your site that were created as part of advertisements, sponsorships or other compensation agreements.

rel="ugc": UGC stands for User Generated Content, and the ugc attribute value is recommended for links within user generated content, such as comments and forum posts.

rel="nofollow": Use this attribute for cases where you want to link to a page but don’t want to imply any type of endorsement, including passing along ranking credit to another page.

When nofollow was introduced, Google would not count any link marked this way as a signal to use within our search algorithms. This has now changed. All the link attributes -- sponsored, UGC and nofollow -- are treated as hints about which links to consider or exclude within Search. We’ll use these hints -- along with other signals -- as a way to better understand how to appropriately analyze and use links within our systems.

Why not completely ignore such links, as had been the case with nofollow?

Links contain valuable information that can help us improve search, such as how the words within links describe content they point at. Looking at all the links we encounter can also help us better understand unnatural linking patterns. By shifting to a hint model, we no longer lose this important information, while still allowing site owners to indicate that some links shouldn’t be given the weight of a first-party endorsement.

We know these new attributes will generate questions, so here’s a FAQ that we hope covers most of those.

Do I need to change my existing nofollows?

No. If you use nofollow now as a way to block sponsored links, or to signify that you don’t vouch for a page you link to, that will continue to be supported. There’s absolutely no need to change any nofollow links that you already have.

Can I use more than one rel value on a link?


Yes, you can use more than one rel value on a link. For example, rel="ugc sponsored" is a perfectly valid attribute which hints that the link came from user-generated content and is sponsored. It’s also valid to use nofollow with the new attributes -- such as rel="nofollow ugc" -- if you wish to be backwards-compatible with services that don’t support the new attributes.

If I use nofollow for ads or sponsored links, do I need to change those?

No. You can keep using nofollow as a method for flagging such links to avoid possible link scheme penalties. You don't need to change any existing markup. If you have systems that append this to new links, they can continue to do so. However, we recommend switching over to rel=”sponsored” if or when it is convenient.

Do I still need to flag ad or sponsored links?


Yes. If you want to avoid a possible link scheme action, use rel=“sponsored” or rel=“nofollow” to flag these links. We prefer the use of “sponsored,” but either is fine and will be treated the same, for this purpose.

What happens if I use the wrong attribute on a link?

There’s no wrong attribute except in the case of sponsored links. If you flag a UGC link or a non-ad  link as “sponsored,” we’ll see that hint but the impact -- if any at all -- would be at most that we might not count the link as a credit for another page. In this regard, it’s no different than the status quo of many UGC and non-ad links already marked as nofollow.

It is an issue going the opposite way. Any link that is clearly an ad or sponsored should use “sponsored” or “nofollow,” as described above. Using “sponsored” is preferred, but “nofollow” is acceptable.

Why should I bother using any of these new attributes?

Using the new attributes allows us to better process links for analysis of the web. That can include your own content, if people who link to you make use of these attributes.

Won’t changing to a “hint” approach encourage link spam in comments and UGC content?


Many sites that allow third-parties to contribute to content already deter link spam in a variety of ways, including moderation tools that can be integrated into many blogging platforms and human review. The link attributes of “ugc” and “nofollow” will continue to be a further deterrent. In most cases, the move to a hint model won’t change the nature of how we treat such links.

We’ll generally treat them as we did with nofollow before and not consider them for ranking purposes. We will still continue to carefully assess how to use links within Search, just as we always have and as we’ve had to do for situations where no attributions were provided.

When do these attributes and changes go into effect?


All the link attributes, sponsored, ugc and nofollow, now work today as hints for us to incorporate for ranking purposes. For crawling and indexing purposes, nofollow will become a hint as of March 1, 2020. Those depending on nofollow solely to block a page from being indexed (which was never recommended) should use one of the much more robust mechanisms listed on our Learn how to block URLs from Google help page.

Source: Webmaster Central Blog